
E6BJet instantly calculates Pressure, Indicated, Density, Temperature-Compensated and True Altitudes. Results are shown in Feet and Metres side-by-side.
It provides instant conversion between QNH and QFE for any given elevation.
Altimeter settings units allow Inches of Mercury, HectoPascals, and millimetres of Mercury, all shown side-by-side for easy conversion if needed.

See Pressure and Density Altitude. On the ground. And in-flight.
To determine Takeoff (and Landing) Pressure and Density Altitudes, use the SURFACE (lower) section of the display:
- Dial in airport elevation, QNH/altimeter (or QFE) and temperature (OAT) in the lower portion of the display.
- Read Density Elevation at the right lower half of the display to see how pressure and temperature affect performance.
The aircraft only cares about Density Elevation/Altitude – higher means less performance. - Pressure Elevation is also displayed.
For in-flight altitude calculations, use the ONBOARD (upper) portion of the display.
Set indicated altitude and Static Air Temperature (SAT), and read Density Altitude in the upper right corner.
- To see the impact on altitude of an altimeter setting different from SURFACE values, disable AUTO by tapping the button. Then dial-in the desired setting directly.
- By default, the App will automatically track the value entered in the SURFACE part of the display to update Indicated, Pressure and Density Altitudes in the ONBOARD section.
- Tap QNH or QFE to set the ONBOARD values to the corresponding SURFACE value.
- Tap STD to set 29.92 Inches/1013.25 HPa/760 mmHg.
- To re-enable “automatic” altimeter tracking, first tap QNH or QFE, then tap AUTO.
- If the ONBOARD altimeter setting is neither QNH or QFE, the values will show in yellow, as a reminder that the setting does not correspond to the SURFACE station value.
Easy Temperature Compensation for IFR Altitudes
E6BJet makes it extremely quick to determine the temperature-compensated altitudes you need to safely fly an approach.
Anytime temperature is below ISA, even when the altimeter is set correctly, your actual altitude/height will be lower than what is shown on your altimeter. Conversely, if temperature is above ISA, actual altitude/height will be higher than shown.
To ensure obstacle clearance in IMC when temperatures are lower than standard, it is recommended to add a temperature correction to procedure turn, FAF and DA or MDA. It may also be required to compensate initial, final and missed approach fix altitudes, as well as intermediate stepdown altitudes and MSA.
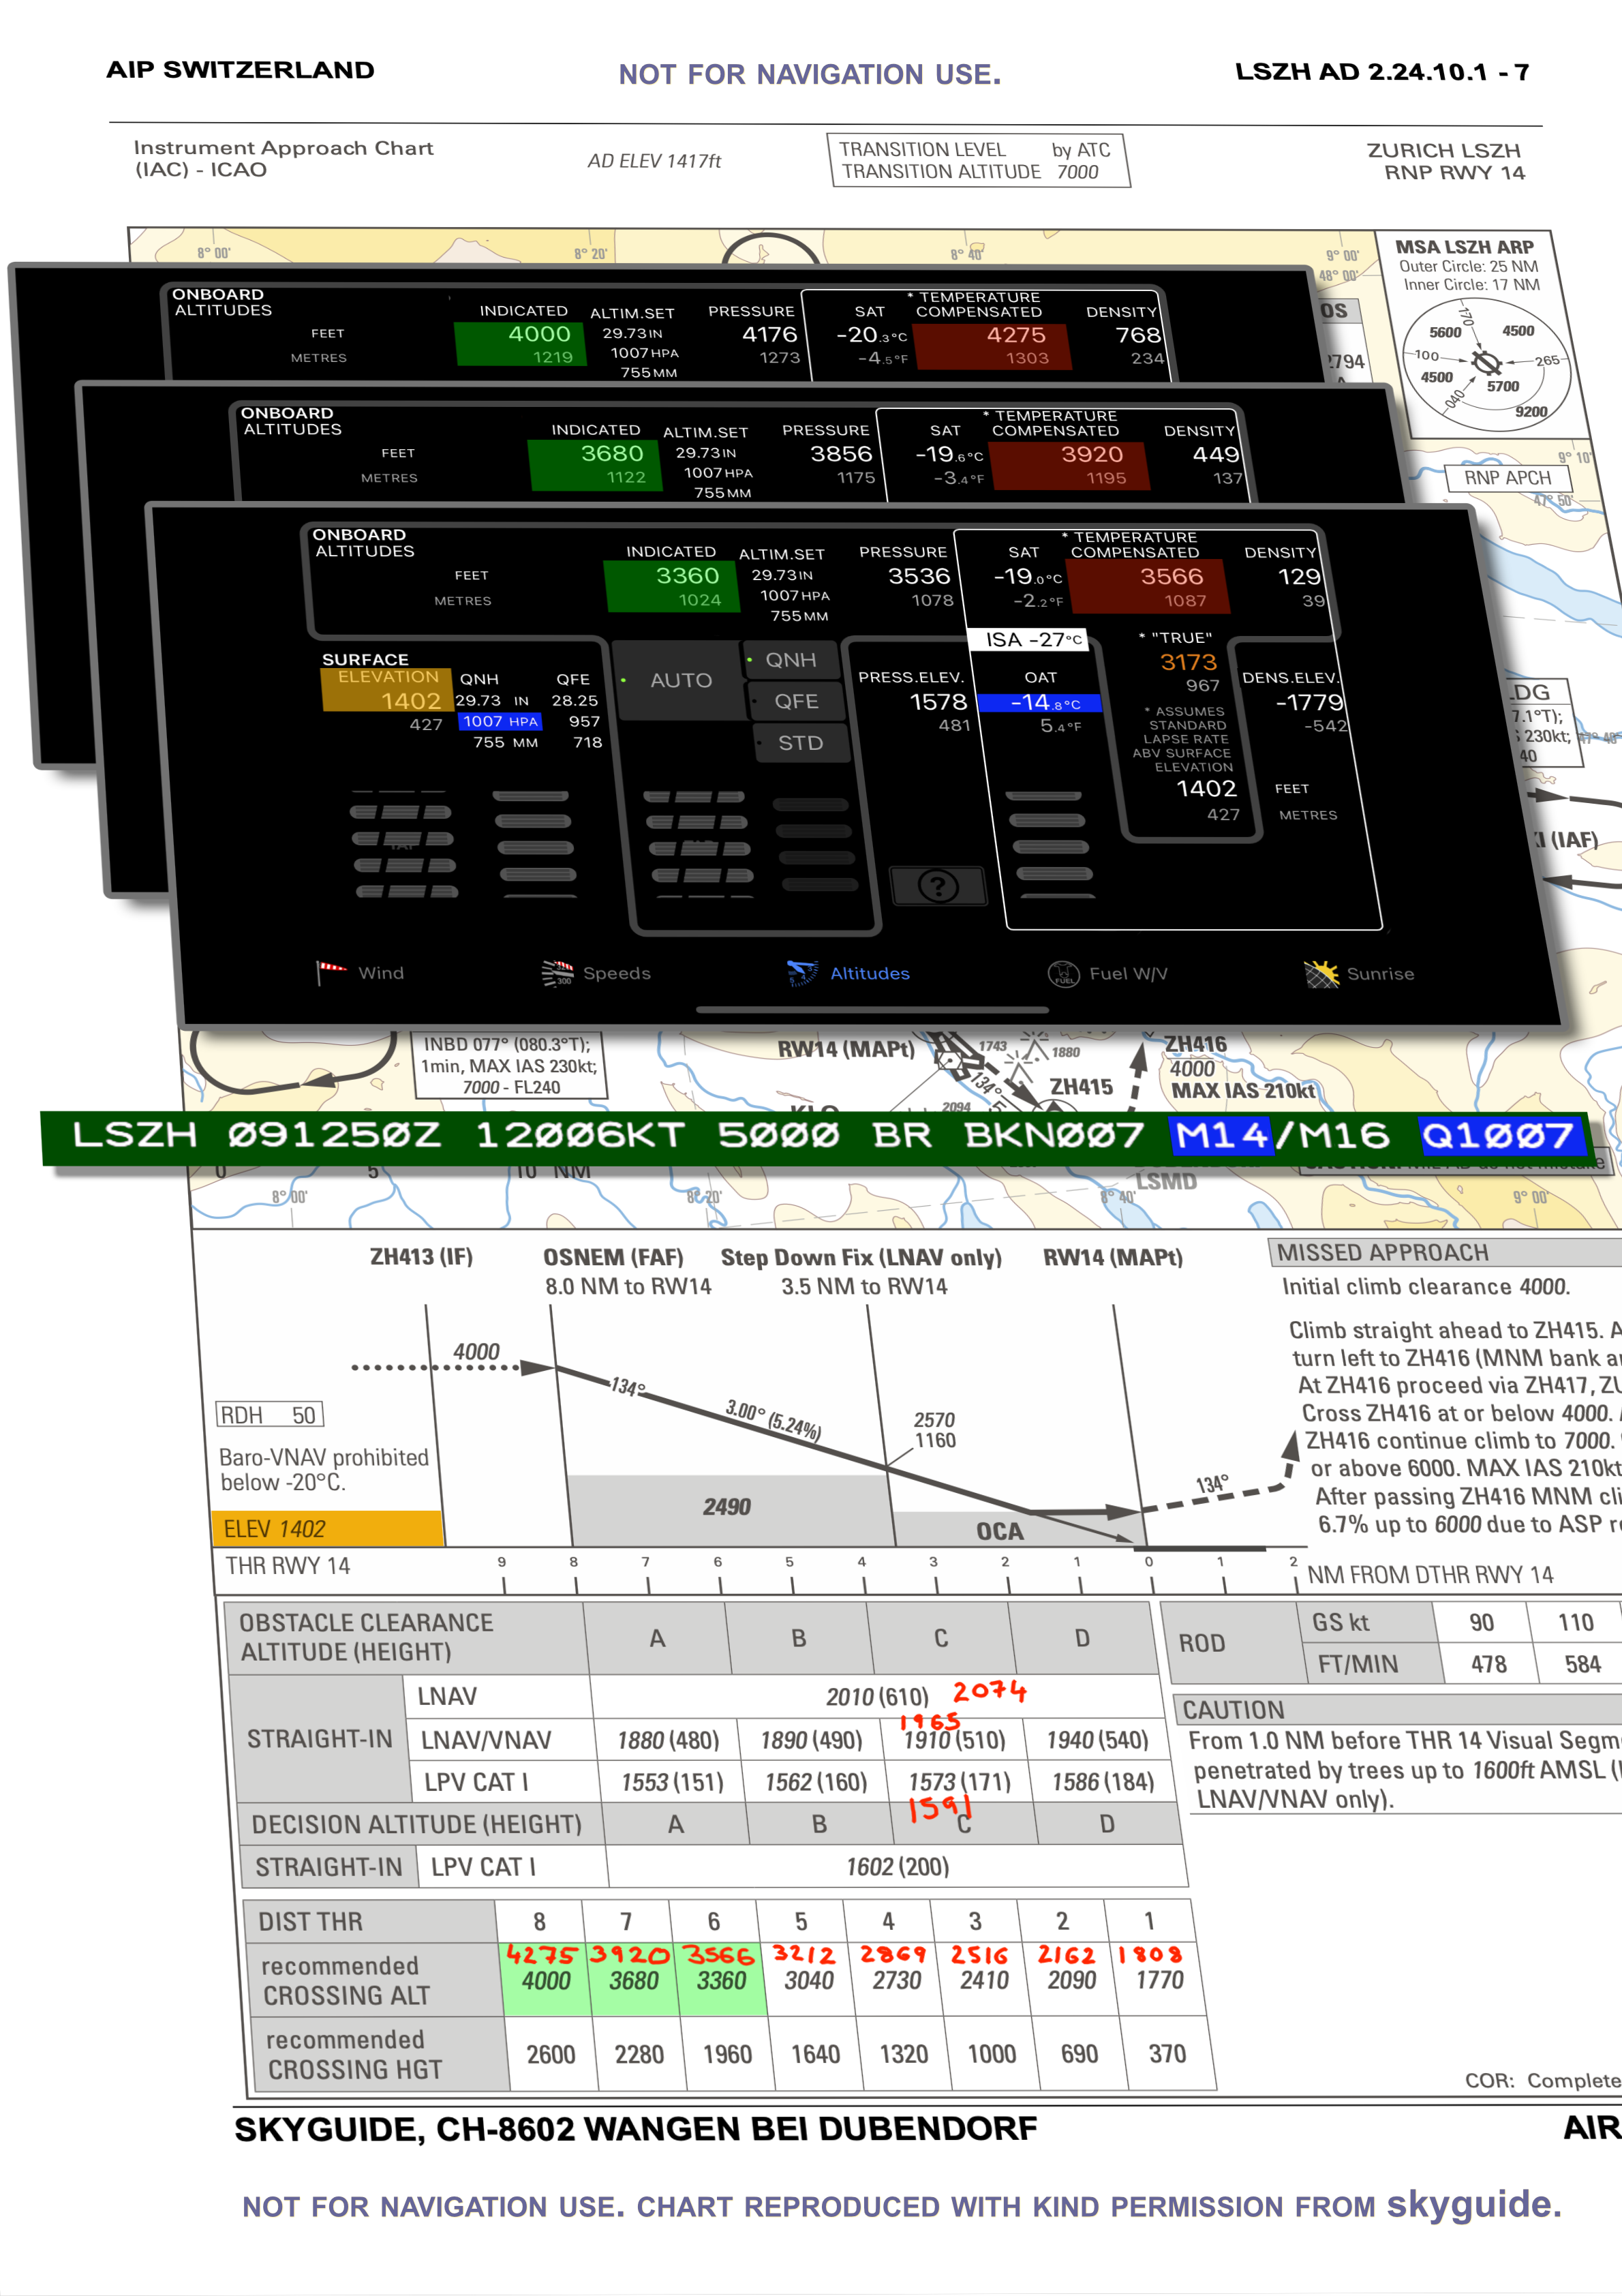
Detailed Example: RNP 14 approach in Zurich, Switzerland, with a surface temperature of -14 Celsius.
The illustration above shows how simple it is to determine the compensated altitudes for this approach. There are only 2 steps:
1. Dial in the airport elevation, QNH/altimeter setting, and the reported surface temperature.
Elevation here is 1402 ft, QNH is 1007 HPa, and the reported surface temperature is -14º Celsius.
2. Set the INDICATED altitude for any fix/altitude for which a temperature-compensated altitude is needed.
At OSNEM, this is 4000 ft.
Read the temperature-compensated altitude located in the white frame on the right portion of the display.
For OSNEM, the compensated altitude is 4275 ft.
THE COMPENSATED ALTITUDE IS THE ONE YOU MUST RESPECT.
Repeat step 2 for each desired fix/altitude.
Results for all the crossing altitudes and the various minima are hand-written in red on the illustrated chart.
True Altitude
E6BJet also displays True Altitude, underneath the temperature-compensated value. For the above conditions at 6 NM from the threshold, the True Altitude shown is 3566 ft. This is the altitude your aircraft would really be at if you were to pass this fix at 3360 ft Indicated Altitude.
Accuracy of temperature correction calculations
There are two common methods to determine temperature corrections. They are:
- using precalculated tables, and,
- using an iterative calculation formula, which is more complex but yields more accurate results.
The precalculated tables are usually found in State AIPs, and provide conservative corrections for heights up to 5000 ft above aerodrome.
E6BJet uses the iterative method, and correction values are valid up to 36 000 feet ASL.
Both methods assume a standard temperature lapse rate. The lapse rate in the actual atmosphere might be significantly different, in which case the accuracy of the results will degrade.
Some aircraft FMS have a temperature correction function. Refer to the manufacturerʼs documentation for more information on how the feature is implemented, and how to use it.
For more information about the calculations, refer to:
- ICAO Document 8168 – Procedures for Air navigation Services – Aircraft operations – Volume 1 – Flight Procedures Part VI, Chapter 3 – Altimeter corrections.
- Transport Canada Aeronautical Manual, TP 14371E – RAC – Rules of the air and air traffic services – Corrections for Temperature.
Always refer to official country-specific Aeronautical Information Publications for handling cold-temperature corrections, including ATC procedures. Some countries may use different or additional methods to ensure obstacle clearance in cold weather.
Convert and Switch between QNH and QFE.
The ONBOARD section of the display, by default, shows Altitudes, which are considered to be above sea level. Prefer to use heights? Tap the QFE button, and see Heights (above ground level) above the surface elevation you have dialed in.
Tap the QNH button to switch back to displaying altitudes.
When QFE is set, labeling for onboard data changes from “Altitudes” to “Heights” (in the top left corner). Where the surface station is located at sea-level, QNH and QFE will be identical, and the labeling will show “Altitudes & Heights”.
Auto QNH/QFE mode: When enabled, it will keep your “altimeter” set to the same pressure that is set for the surface station, and to the reference selected for the altimeter (QNH or QFE). In Auto mode, the thumbwheel for the altimeter setting is greyed-out and will not function. If you wish to manually set the altimeter, simply disable Auto mode.
Note: Auto mode cannot be enabled if a value other than QNH or QFE is set on the altimeter.
Logging altitude on iPhones with barometric pressure sensor
The iPhone 6 and later models have a built-in barometric pressure sensor. Pressure readings can be used to calculate device pressure altitude/height, and, with the correct altimeter setting, a “device altitude/height”.
Important: This feature will only work if you have enabled Fitness Tracking on your device, found under Settings – Privacy – Motion & Fitness.
Displaying device altitude. E6BJet can optionally display the sensed pressure and indicated device altitude/height. This feature is disabled by default. If enabled and a sensor is present, its information will be displayed in the Onboard altimetry frame, to the left of indicated altitude/height.
As you would expect, the device barometer is not aviation-authority certified, and cannot be relied on as a substitute for a proper altimeter.
The pressure displayed underneath device altitude/height is the pressure that was most recently sensed by the device. It is not an altimeter setting, and cannot be adjusted by the user.
Recording device altitude and time. You can also optionally enable recording of device pressure altitude readings and altimeter setting to a text file stored on your device. When enabled, a new entry will be written to the file anytime pressure altitude changes, along with date and time of the change. Recording is disabled by default.
Enable the display, and/or the recording of device altitude information via the Settings app. From there, locate the E6BJet settings icon, and tap it to access E6BJet settings. Use the buttons provided to enable display and/or recording.
Display of device altitude must be enabled in order for recording to take place.
When recording is enabled, REC and a steady red dot will be displayed above device altitude.
Caution: the recorded data may allow inferring some information about your movements, so be sure to disable recording if this is undesirable.
E6BJet will record a new entry with the date and time (UTC), pressure altitude, and the currently-set altimeter setting, every time the altitude changes by one foot or more. E6BJet must be in the foreground, but does not need to be displaying the Altitudes tab constantly. Entries will look as follows:
2020-03-24;13:40:48;UTC; press.alt.(ft)=;2511; alt.setting(InHg)=;29.92
2020-03-24;13:40:54;UTC; press.alt.(ft)=;2510; alt.setting(InHg)=;29.92
2020-03-24;13:41:08;UTC; press.alt.(ft)=;2509; alt.setting(InHg)=;29.92
Entries are separated by semicolons, to allow easy importing to other applications such as spreadsheets.
Recorded device altitude data is stored on your device, in a text file named “E6BaltitudeLog.txt”, which can be accessed via the Files app.
(To do so, launch the Files app, select “On my iPhone” from the available locations, and look for a folder named E6BJet. It contains the file “E6BaltitudeLog.txt” (the .txt suffix does not appear). Tap on it to view the contents – you will be asked which app should be used for viewing.
Note that neither the file, nor the folder, will exist if recording has not previously been enabled.
Deleting recorded data. You can delete the file at any time, using the Files app. Do note that if you leave recording enabled, a new copy of the file will be created and logging will start afresh when you reopen E6BJet.
Click here to return to the home page.