Overview
Enter geographic coordinates, and a date, to display Sunrise and Sunset times for that location.
Beginning of morning Civil Twilight (BMCT), and end of evening Civil Twilight (EECT) are also shown.
You can calculate times for any location except directly at the North or South poles.
Rise/Set/Twilight times can be determined between January 1, 1900 and December 31, 2999.
Coordinates for a number of aerodrome locations are provided, and you can add, modify or delete locations. Modified location data can be exported, and reimported.
If a time zone identifier is entered, local times will be calculated with awareness of Daylight Saving time use, throughout the date range mentioned above.
Alternatively, a constant UTC offset can be specified to also allow local time calculation (the offset will have to include any applicable adjustment for Daylight Saving time for the selected date).
The format for coordinate data entry can be selected using the Units button to the right of the coordinates. Formats are:
– degrees, minutes, seconds, and decimal seconds (to 4 digits),
– degrees, minutes, and decimal minutes (to 5 digits),
– degrees, and decimal degrees (to 7 digits).
(This can be useful for converting coordinates between the different formats even if sunrise/set times are not needed)
Coordinates are always displayed in all three formats, with the input format in larger text inside a cyan frame.
Tap the ‘Help’ button (labeled with a question mark) to bring up quick-reference information. More complete details are provided below.
Selecting a date
Select a date for which you need rise and set times, using the horizontal thumbwheel. Enter a Local date, not a UTC date.
Tap the wheel to choose increment values to be a day, a month, or a year.
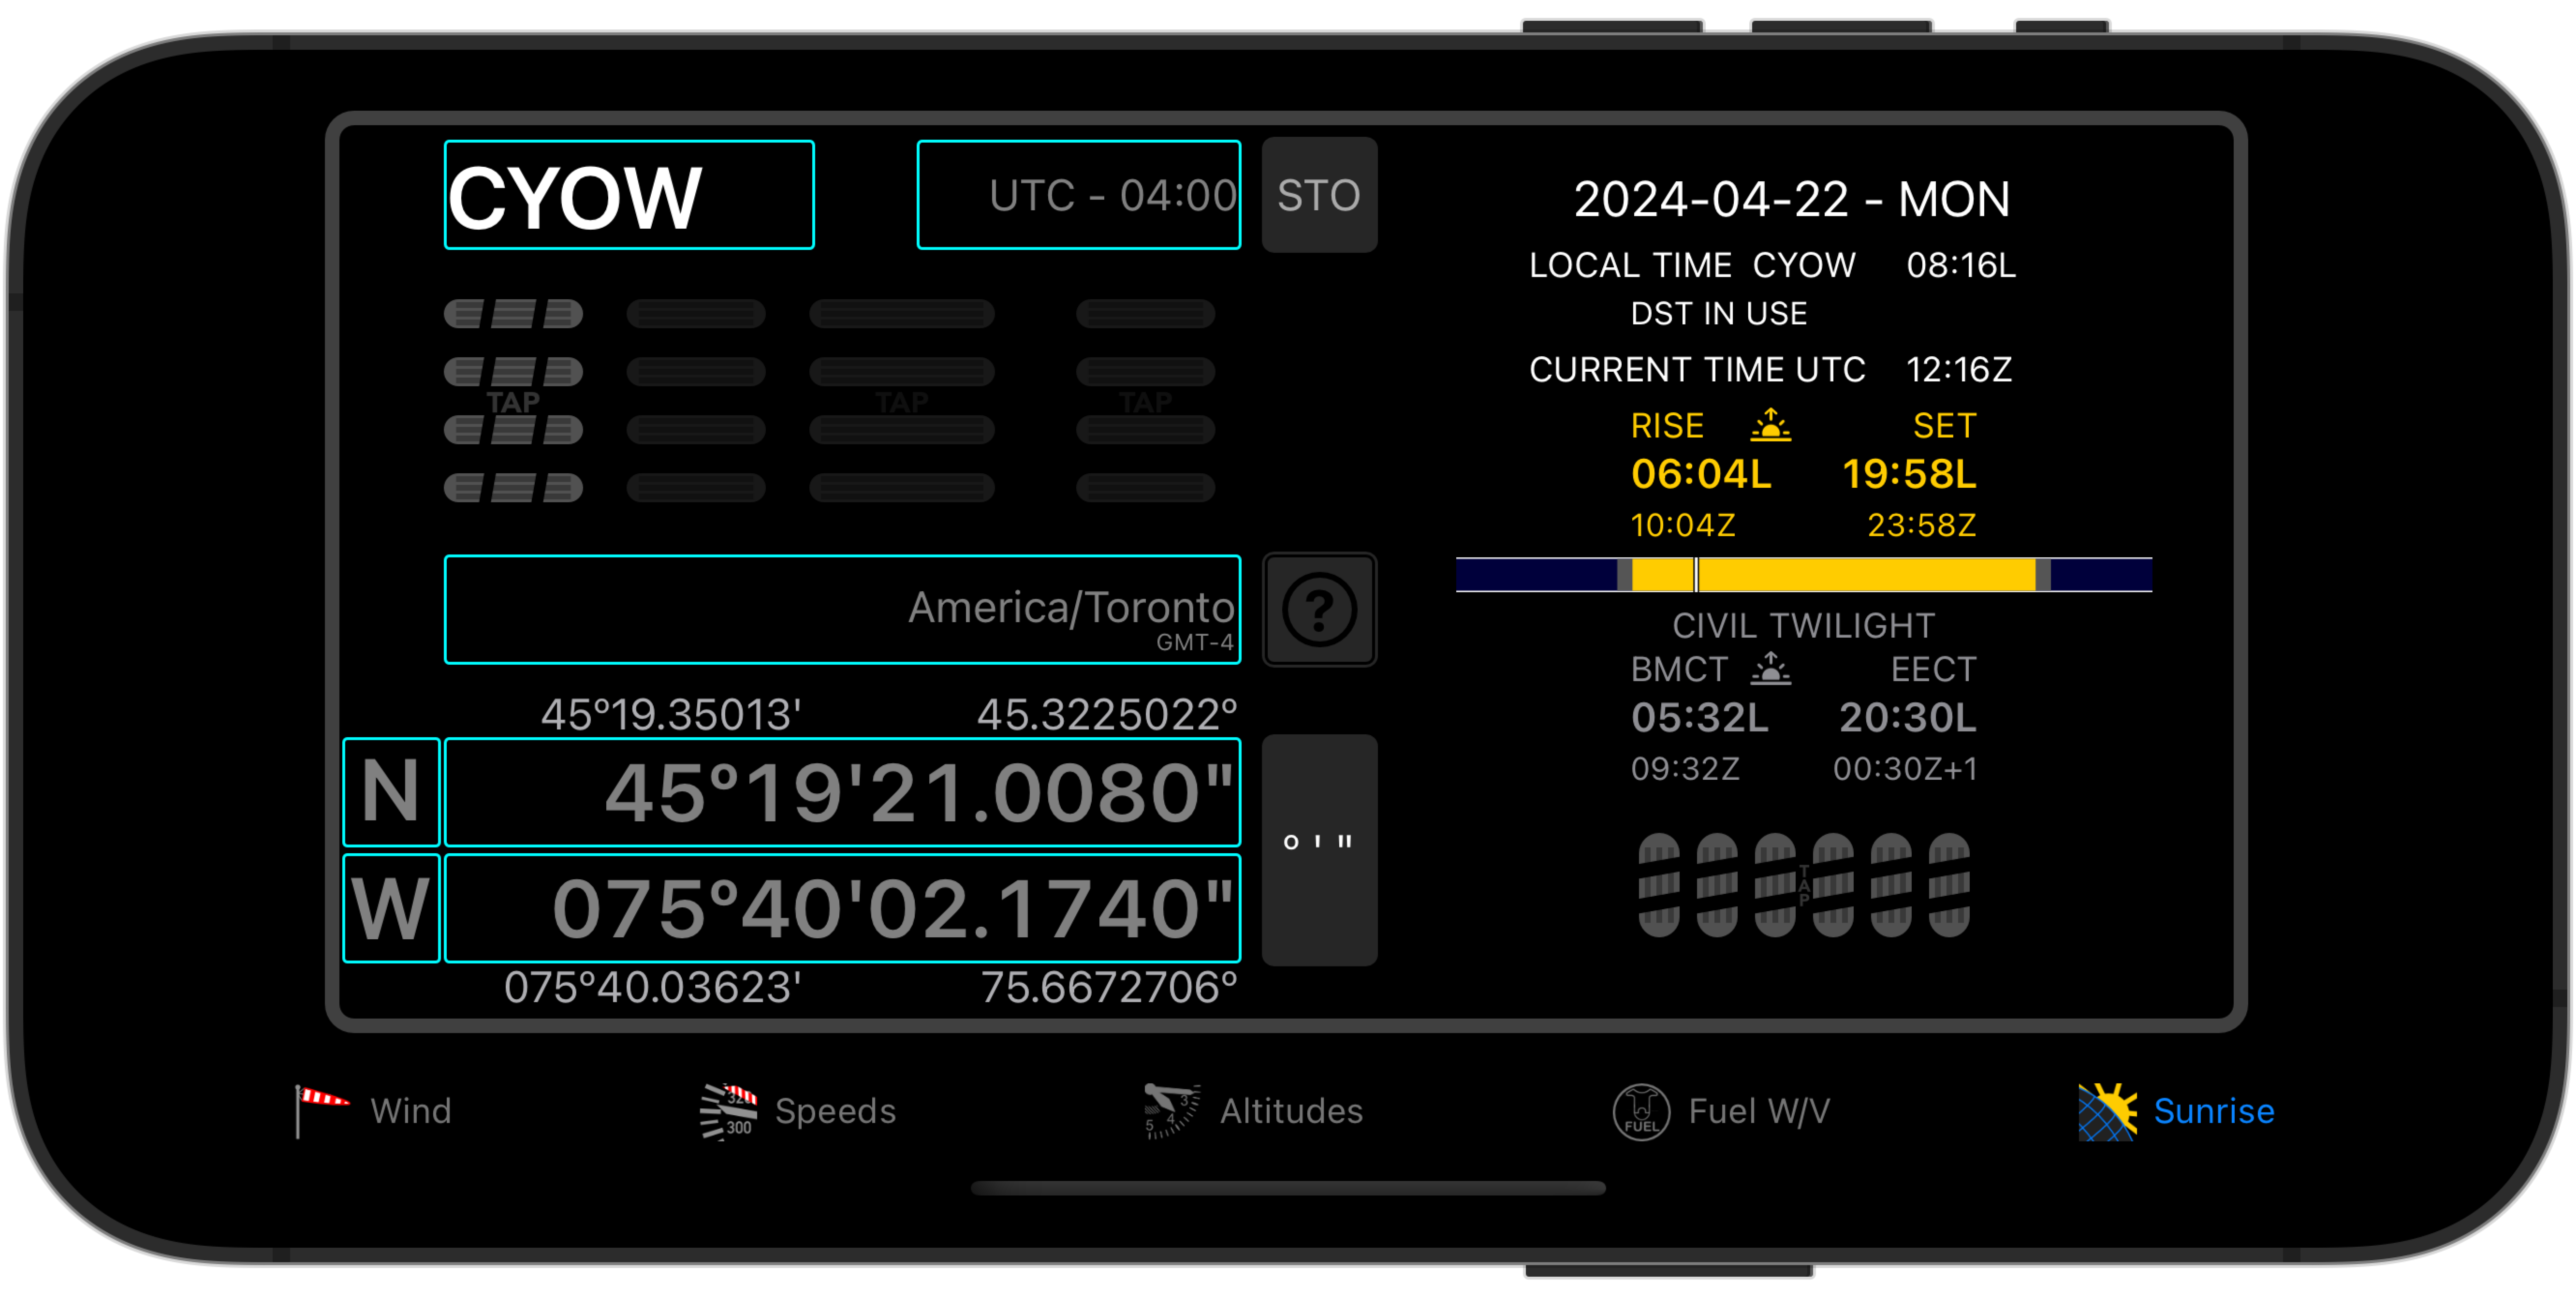
Display of rise, set and twilight times
Times are displayed in Local and UTC time, the Local time being highlighted. In some cases, the UTC time will not be on the same date as the local time. If it falls on the prior or the next day, a ‘-1’ or a ‘+1’ respectively will show beside the UTC time.
BMCT is the beginning of Morning Civil Twilight time. If the sun rises on the day, Morning Civil Twilight time ends at sun rise time.
EECT is the end of Evening Civil Twilight time. If the sun rose on the day, Evening Civil Twilight time starts at sunset.
If the sun does not rise on the day, Civil Twilight starts at BMCT and ends at EECT.
If the sun remains more than 6 degrees below the horizon throughout a day, ‘NO TWILIGHT’ will display. If the sun remains up all day, ‘NONE’ will display for Civil Twilight times.
Calculation of Local times
If a time zone identifier is entered for the location, correct local times will be calculated, taking into account daylight savings time if applicable.
Alternatively, if none of the system time zone identifiers are appropriate for a location, you can enter a UTC offset to be used for calculations. The offset should include a daylight savings time adjustment for the selected date, as this cannot be determined automatically without a time zone identifier.
The UTC times displayed will be correctly calculated regardless of the accuracy of the offset value.
Location database and default location.
You can assign an identifier of up to five letters and/or digits to a location, and store the location data for later retrieval. A small number of aerodrome locations come pre-loaded, using their ICAO codes as identifiers. (This information was compiled from publicly available sources, but is not verified, nor aviation-certified).
A default location can be set, which will be displayed whenever the app is relaunched.
Entering data
Locations
By default, the location identifier is highlighted. Turning the thumbwheel underneath will step through the stored locations.
Tap the thumbwheel to choose whether the steps will be by individual location, by the first letter of the identifier (i.e. ICAO region code), or by the first two letters of the identifier (i.e. ICAO country code).
Latitude and Longitude
To enter a latitude or longitude, tap in the respective cyan frame. The latitude or longitude will be highlighted, and the thumbwheels underneath can be used to change the coordinates.
The wide thumbwheel can be tapped to specify which decimal digit to increment. That digit’s background will be highlighted.
Tap the cardinal point for latitude or longitude, to toggle between N, S and E, W respectively.
Time Zone identifier and abbreviation
Tap in the cyan time zone identifier frame to set a location’s time zone. The thumbwheel will step through the (iOS-provided) time zone identifiers.
Tap the thumbwheel to choose whether steps will be by identifier, or by continent/area.
E6BJet will determine the appropriate UTC offset for the identifier and date, including a daylight savings adjustment if applicable, and display it.
Directly underneath the time zone identifier, E6BJet displays the corresponding time zone abbreviation (also provided by iOS). This is not the same as the UTC offset value shown near the top of the display.
Examples of abbreviations are: EST (Eastern Standard Time), PDT (Pacific Daylight Savings Time), CET (Central European Time), EEST (Eastern European Daylight Savings Time) etc.
If no abbreviation is provided, GMT+x will be shown, which will match the UTC Offset display.
The abbreviations shown depend on your device, and the Language & Region settings you have chosen.
UTC Offset
The UTC offset shown is used to calculate local and UTC times for the date.
If a location has a time zone identifier, the UTC offset, including daylight savings adjustment, will be determined automatically for the selected date.
If a location does not have an associated time zone identifier, ‘NO TIME ZONE’ will be displayed. In this case, the system cannot determine the UTC offset, nor whether daylight saving adjustments apply. You will need to set/change the offset value in either hourly or 15-minute increments. Once set, it will remain constant regardless of the date you select.
The UTC offset will show ‘USR’, to indicate the offset is user-defined.
Tap the thumbwheel to choose increments of one hour, or of 15 minutes.
Saving your changes
Times are continuously updated with every change you make to the displayed coordinates, time zone identifier, UTC offset or date. However, these changes will not be remembered permanently, unless you choose to do so by storing them.
You use the STORAGE menu to delete, modify or create a new location and store the data permanently. The menu also allows to set a location as being the default.
Tap STO to access the menu.
Delete or update a location’s data.
To delete the location that is currently being displayed, access the STORAGE menu, and select DELETE. You will be asked to confirm the deletion, or to cancel the operation. Dismiss the STORE menu using ‘CANCEL’, or ‘DONE’ after the deletion was made.
To store updated information for a location, please note the order of the required steps:
– FIRST dial in the updated coordinates and time zone identifier (or UTC Offset).
– SECOND, access the storage menu and select OVERWRITE. You will be asked to confirm or cancel.
The ‘OVERWRITE’ option will not be available if none of the location data was changed before accessing the storage menu.
Store data for a new location.
Creating a new location involves FIRST modifying the information of an existing location, SECOND accessing the storage menu and entering a different location identifier using the thumbwheels.
Tap the rightmost thumbwheel to allow adding a fifth character or digit for the identifier.
If the identifier does not yet exist in the database, the storage menu will present STORE and CANCEL options. If the location already exists in the database, the storage menu will present OVERWRITE, DELETE and CANCEL options.
Set a location as default
Select a location, and access the storage menu. There, tap the ‘SET AS DEFAULT’ button.
Note: If you have modified any of the location’s data, ‘SET AS DEFAULT’ will not be available.
Graphic Display
Rise, Set and Civil Twilight times are also shown on a horizontal bar, that represents the 24 hours of the selected day.
Midnight blue segments of the bar represent times before morning Civil Twilight begins and after evening Civil Twilight ends.
Grey segments represent periods of morning and evening Civil Twilight.
Yellow segments represent times when the sun is up.
A white vertical marker on the bar represents the current time. It is updated every 30 seconds.
‘Night time’ for aviation purposes
For aviation purposes, ‘night time’ is frequently defined as starting 20 minutes after sunset and ending 20 minutes before the next sunrise. Another common definition is the time between the end of evening Civil Twilight, and the subsequent start of morning Civil Twilight.
Other definitions of ‘night time’ may apply. Consult appropriate AIP information from the relevant Aviation Authorities to determine the applicable definition.
Special situations and irregular events
For some locations and dates, there may not be a sunrise or sunset at all. This occurs notably in the polar regions, where the sun will always be up (‘midnight sun’), or always down (‘polar night’). E6BJet will then display ‘SUN UP ALL DAY’ or ‘SUN DOWN ALL DAY’, respectively.
(For an example of this, select ENSB (Svalbard/Longyearbyen, Norway, N 78º14’46 / E 015º27’56) as your location, and a date of 19 April 2021).
It follows that for those same places, on the day when the ‘midnight sun’ season starts, there may be only a rise but no set time. In that case, ‘NONE’ will be displayed in place of a time. (See ENSB/Svalbard on 17 April 2021 – SET time is ‘NONE’). The same goes for the start of polar night season (where there will be only a set time, no rise).
Similarly, there will be places and times where twilight does not occur because the sun never descends low enough – see ‘Definitions’ of twilight further down. E6BJet then shows ‘NONE’ for civil twilight (See again ENSB/Svalbard on 19 April 2021).
And, if there is no twilight because the sun never rises high enough, ‘NO TWILIGHT’ is shown (e.g. ENSB/Svalbard on 19 December 2020).
In some cases, the sun’s set time will be earlier than the rise time. This happens as the year progresses, when the sunset shifts from being very late on the previous days to actually being early in the current day. If that happens, the sun usually rises again very shortly, and may not set again in the current day. (e.g. ENSB/Svalbard on 18 April 2021 – ‘SET’ time is earlier than ‘RISE’).
Lastly, there will be times and places (not necessarily in the polar regions) where the sun will rise (or set) twice over the course of a day. Where this occurs, E6BJet will display the second rise (or second set) time, either to the right or to the left of the rise and set times.
They will be placed so that they will appear in their natural order, earliest to latest. (Also ENSB/Svalbard, 25 August 2020, ‘SET’ at 00:14L, ‘RISE’ at 01:48L and second ‘SET’ that day at 23:47L).
The graphic display makes this more apparent and helps with the interpretation of textual time information.
Accuracy of times and atmospheric refraction
The algorithms used provide times that are generally accurate within 3 minutes for sub-polar latitudes (less than approximately 66 degrees North or South). In polar latitudes the accuracy decreases to be within about 10 minutes. Even though E6BJet takes theoretical refraction into account, actual temperature in the atmosphere has a significant impact on actual refraction, and thus the potential to introduce significant differences between calculated and observed times.
The U.S. NOAA, as well as various commercial and non-commercial internet sources, provide online calculators that you can use to compare results.
Do note that E6BJet does not require online access to make its calculations.
Definitions
Sunrise is defined as the time of day when the top of the sun’s disc first becomes visible at the horizon. In fact, when this occurs, the top of the disc is actually still below the horizon, but it is nevertheless visible because of atmospheric refraction. Sunset is similarly defined.
Morning Civil Twilight begins when the center of the sun’s disc climbs through 6 degrees below the horizon, and ends at sunrise. Evening Civil Twilight begins at sunset, and ends when the center of the sun’s disc descends through 6 degrees below the horizon.
Night is technically defined as the time before astronomical twilight start and after astronomical twilight end. These occur as the sun passes through 12 degrees below the horizon. Since this does not correspond to aviation use, we have avoided using the term ‘night’ here.
Exporting data from the Locations database
E6BJet can export contents of the Locations database, for later importing. This is useful for backup purposes, if you have entered custom locations and wish to preserve them. You can then reimport your custom locations in the event you ever need to completely reset your device, or after uninstalling and reinstalling E6BJet. You can also use export your custom locations in order to make them available on new or additional devices.
Export (and Import) functions are accessed by a long-press (press and hold) of the STO button.
Export
Selecting EXPORT will only export the locations you created or modified. The sample locations pre-loaded in the database will not be exported, as they will be recreated whenever E6BJet is reinstalled.
When you select EXPORT, E6BJet creates a file named ‘E6BLocations yy-mm-dd hh:mmZ.txt‘ (where yy-mm-dd hh:mmZ will be replaced with the actual date and time the export was done). This file will be placed on your device, in a folder named ‘E6BJet’.
You can view exported files, and their contents, by using the ‘Files’ app and navigating to ‘On my Device’ section, then selecting the ‘E6BJet’ folder.
(On iPad, use the ‘Quick Look’ option to view contents).
If you select EXPORT but have not changed any of the location’s data, the exported file will be essentially empty.
(The ‘E6BJet’ folder will also contain a file named ‘E6BInfo.txt’. This file is there for technical reasons – to make the folder visible to the ‘Files’ app – but is not essential for E6BJet operation.
If you have enabled device altitude logging, the log file – named ‘E6BAltitudeLog.txt’ – will also be found there.
If you no longer need these files, you can delete them; E6BJet functionality will not be affected, but the ‘E6BJet’ folder will disappear. The folder and the ‘E6BInfo.txt’ file will be re-created the next time the app is launched.)
Safeguarding exported files
IMPORTANT! AN ADDITIONAL STEP IS REQUIRED TO PERMANENTLY SAFEGUARD THE EXPORTED FILE! Please see the next paragraph for information on how to do so.
PLEASE ENSURE YOU SAFEGUARD AN EXPORTED FILE BEFORE DELETING THE APP OR RESETTING YOUR DEVICE.
Do this by copying the exported file to a location outside the ‘E6BJet’ folder. This is easily done with the ‘Files’ app, by placing it elsewhere on the device, or using the ‘Share’ option to email it to yourself.
Importing Location data
A previously exported file can be reimported if needed (such as after uninstalling and reinstalling E6BJet).
For the ‘Import’ function to be available, the following is required:
- E6BJet must be installed and have been launched at least once before attempting to import.
- The file to be imported must then be:
a) placed into the ‘E6BJet’ folder on the device.
b) it must be named ‘E6BLocations.txt’. Since an exported file will have a ‘ yy-mm-dd hh:mmZ‘ suffix, it must be renamed before it can be imported. Do this using the ‘rename’ function provided by the ‘Files’ app. - To start importing the file, long-press the STO button. If the appropriate file is available, ‘IMPORT’ will be available on the menu. Once the import operation is complete, select ‘DONE’ to dismiss the Import/Export menu.
Technical Note on exported files
When you export location data to a file, it will be in JSON format. If, before importing such a file, you modify the data in it and “break” the JSON format, importing will fail. No data at all will be imported, but E6BJet will write the available error information to a file named ‘E6BImpExpError.txt‘ in the ‘E6BJet’ folder, which you can examine for details.
Please contact us if you would like more information on the contents of exported files, or have your own location data that you would like to import.
Click here to return to the home page.